따라하기: 할 일 앱 만들기
처음 쓰는 분을 위한 단계별 안내입니다. 파일 세 개로 할 일 앱을 만들고, 목록 저장과 컴포넌트까지 붙인 뒤 인터넷에 올립니다. 설치할 것은 에디터와 파이썬뿐이고 빌드 도구는 없습니다. 한 단계가 10분 정도 걸립니다.
단계마다 완성본 열기 링크가 있습니다. 막히면 완성본과 내 파일을 비교해 보세요. 이 페이지의 코드는 테스트를 통과한 그 파일입니다.
준비
- 에디터: Visual Studio Code를 설치합니다. 메모장도 되지만 색 구분이 있어 편합니다.
- 파이썬: 파일을 브라우저로 보여 줄 작은 서버에 씁니다. 터미널(Windows는 PowerShell)에
python --version을 입력해 버전이 나오면 준비된 것입니다.- 없으면 python.org에서 설치하고, Windows에서는 설치 첫 화면의 Add python.exe to PATH를 체크합니다.
- 폴더: 바탕화면 등에
todo폴더를 만들고 VS Code에서 파일 → 폴더 열기로 엽니다.
서버는 todo 폴더 안에서 실행합니다. VS Code에서 터미널 → 새 터미널을 열고 아래를 입력한 뒤, 브라우저에서 http://localhost:8080/을 엽니다. 끝낼 때는 터미널에서 Ctrl+C를 누릅니다.
python -m http.server 8080- 파일을 더블클릭해서 열면(
file://) 브라우저가 일부 기능을 막습니다. 항상 위 주소로 엽니다. - 브라우저에서 F12를 누르면 개발자 도구가 열립니다. Console 탭에 빨간 글이 보이면 코드 어딘가가 틀린 것입니다. 개발용 vfunc는 흔한 실수를 노란 경고로 알려 줍니다.
1단계: 첫 화면
todo 폴더에 파일 세 개를 만듭니다. 먼저 index.html입니다. 화면의 뼈대이고, vfunc와 내 코드를 불러옵니다.
<!DOCTYPE html>
<html lang="ko">
<head>
  <meta charset="utf-8">
  <meta name="viewport" content="width=device-width, initial-scale=1">
  <meta http-equiv="Content-Security-Policy"
        content="default-src 'self'; script-src 'self' https://cdn.jsdelivr.net; style-src 'self' https://cdn.jsdelivr.net; img-src 'self' data:; object-src 'none'; base-uri 'none'">
  <title>할 일 — 1단계</title>
  <link rel="stylesheet" href="https://cdn.jsdelivr.net/npm/vfunc@1.2.0/css/vfunc.tokens.css"
        integrity="sha384-QwsFKKFVXW8Lo7pML80GpQro2b0FlTfTrSjGN+YMCyx868Oa2bXlbYRGuUUbgiVw" crossorigin="anonymous">
  <link rel="stylesheet" href="./style.css">
</head>
<body>
  <main class="todo">
    <h1 class="todo__title">오늘 할 일</h1>
    <div id="app"></div>
  </main>
  <script src="https://cdn.jsdelivr.net/npm/vfunc@1.2.0/dist/vfunc.js"
        integrity="sha384-HOwph430qtUZpsvBjI0IzL1lkEipwi7yZYM7X7z21/bLJsChFHRF9E5OvWde7RjH" crossorigin="anonymous"></script>
  <script src="./app.js"></script>
</body>
</html>
Content-Security-Policy줄은 보안 설정입니다. 이 페이지와 CDN(jsdelivr)의 파일만 실행하도록 허용합니다. 그대로 두세요.vfunc.tokens.css는 색·간격·글꼴 같은 디자인 토큰입니다. 라이트·다크 테마가 들어 있습니다.vfunc.js는 개발용 파일입니다.integrity는 받은 파일이 바뀌지 않았는지 브라우저가 확인하는 값입니다.<div id="app">이 앱이 그려질 자리입니다.
style.css는 끝까지 이 파일 하나를 씁니다. 복사해 두고 넘어가도 됩니다. 색과 간격은 모두 var(--vf-…) 토큰이라 테마가 바뀌면 함께 바뀝니다.
/* 할 일 앱의 스타일. 색·간격·글꼴은 토큰(var(--vf-*))만 씁니다. */
*, *::before, *::after { box-sizing: border-box; }

body {
  margin: 0;
  background: var(--vf-color-bg);
  color: var(--vf-color-text);
  font-family: var(--vf-font-body);
  font-size: var(--vf-font-size-md);
  line-height: var(--vf-line-height);
}

.todo { max-width: 560px; margin: 0 auto; padding: var(--vf-space-6) var(--vf-space-4); }
.todo__title { margin: 0 0 var(--vf-space-4); font-size: var(--vf-font-size-2xl); }
.todo__label { display: block; margin-bottom: var(--vf-space-1); font-weight: var(--vf-font-weight-strong); }
.todo__greeting { font-size: var(--vf-font-size-lg); }

.todo__form { display: flex; gap: var(--vf-space-2); margin-bottom: var(--vf-space-4); }
.todo__input {
  flex: 1;
  width: 100%;
  padding: var(--vf-space-2) var(--vf-space-3);
  border: 1px solid var(--vf-color-border-strong);
  border-radius: var(--vf-radius-md);
  background: var(--vf-color-surface);
  color: var(--vf-color-text);
  font: inherit;
}
.todo__button {
  padding: var(--vf-space-2) var(--vf-space-4);
  border: 0;
  border-radius: var(--vf-radius-md);
  background: var(--vf-color-primary);
  color: var(--vf-color-on-primary);
  font: inherit;
  cursor: pointer;
}
.todo__button:hover { background: var(--vf-color-primary-hover); }
.todo__input:focus-visible, .todo__button:focus-visible, .todo__remove:focus-visible {
  outline: none;
  box-shadow: var(--vf-focus-ring);
}

.todo__list { list-style: none; margin: 0; padding: 0; }
.todo__item {
  display: flex;
  align-items: center;
  gap: var(--vf-space-2);
  padding: var(--vf-space-2) var(--vf-space-3);
  margin-bottom: var(--vf-space-2);
  border: 1px solid var(--vf-color-border);
  border-radius: var(--vf-radius-md);
  background: var(--vf-color-surface);
}
.todo__text { flex: 1; }
.todo__item[data-state="done"] .todo__text { color: var(--vf-color-text-muted); text-decoration: line-through; }
.todo__remove {
  border: 0;
  background: transparent;
  color: var(--vf-color-text-muted);
  font: inherit;
  cursor: pointer;
}
.todo__remove:hover { color: var(--vf-color-danger-text); }
.todo__footer { margin: var(--vf-space-3) 0 0; color: var(--vf-color-text-muted); font-size: var(--vf-font-size-sm); }
app.js가 vfunc 코드입니다.
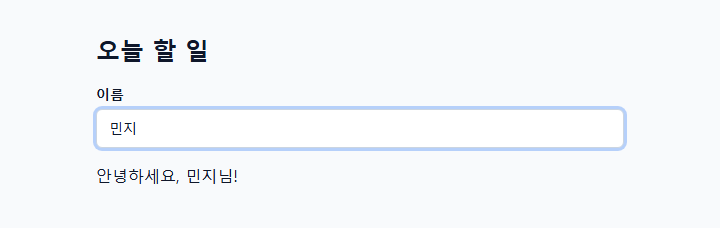
// 1단계: 컴포넌트 하나. 상태(state)를 바꾸면 화면이 다시 그려집니다.
const hello = vf.vfunc({
  state: { name: '' },
  render: (s) => vf.html`
    <label class="todo__label" for="name">이름</label>
    <input class="todo__input" id="name" data-action="rename" value="${s.name}"
           placeholder="이름을 입력하세요" autocomplete="off">
    <p class="todo__greeting" data-ref="greeting">안녕하세요, ${s.name || '손님'}님!</p>`,
  delegates: [{
    selector: '[data-action="rename"]',
    eventType: 'input',
    onEvent: (e) => { e.sender.name = e.target.value; }
  }]
});

hello.mount('#app');
vf.vfunc({ … })가 컴포넌트(화면의 한 부분)를 만듭니다.state는 컴포넌트가 기억하는 값입니다.render는 state를 받아 HTML을 돌려주고, state가 바뀌면 다시 불립니다.vf.html로 만든 HTML은 안전합니다. 이름에<b>굵게</b>를 넣어 보세요. 굵어지지 않고 글자 그대로 보입니다.delegates는 이벤트 연결입니다.data-action="rename"인 요소에서input이 일어나면e.sender.name을 바꾸고, 그러면 화면이 다시 그려집니다.hello.mount('#app')이 컴포넌트를#app자리에 붙입니다.
2단계: 할 일 추가하기
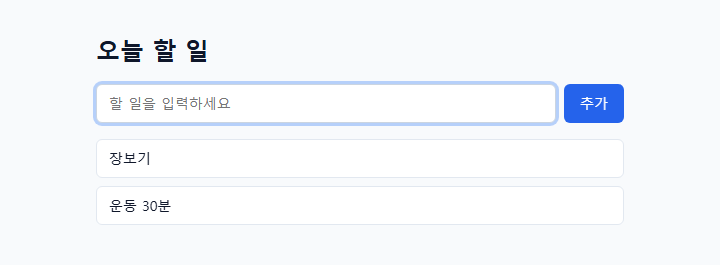
이제 이름 대신 할 일을 받습니다. app.js를 아래로 바꿉니다. index.html과 style.css는 그대로입니다.
// 2단계: 할 일 추가. 입력한 내용을 목록(state.items)에 넣으면 목록이 다시 그려집니다.
let nextId = 1;

const todo = vf.vfunc({
  state: { items: [] },
  render: (s) => vf.html`
    <form class="todo__form" data-action="add">
      <input class="todo__input" name="text" data-ref="input" aria-label="할 일"
             placeholder="할 일을 입력하세요" autocomplete="off" required>
      <button class="todo__button" type="submit">추가</button>
    </form>
    <ul class="todo__list">
      ${s.items.map((item) => vf.html`<li class="todo__item">${item.text}</li>`)}
    </ul>`,
  delegates: [{
    selector: '[data-action="add"]',
    eventType: 'submit',
    onEvent: (e) => {
      e.event.preventDefault();                   // 폼 제출로 페이지가 새로고침되지 않게 합니다
      const text = e.sender.refs.input.value.trim();
      if (!text) return;
      e.sender.items = e.sender.items.concat({ id: nextId++, text: text });
    }
  }]
});

todo.mount('#app');
- 목록은
state.items배열입니다.render에서items.map(…)으로 항목마다<li>를 만듭니다. - 폼은 제출하면 페이지를 새로 불러오려 합니다.
e.event.preventDefault()가 그것을 막습니다. data-ref="input"을 붙인 요소는e.sender.refs.input으로 찾습니다.- 목록을 바꿀 때는
concat으로 새 배열을 만들어 대입합니다. 대입하면 vfunc가 다시 그립니다.
3단계: 완료 표시와 삭제
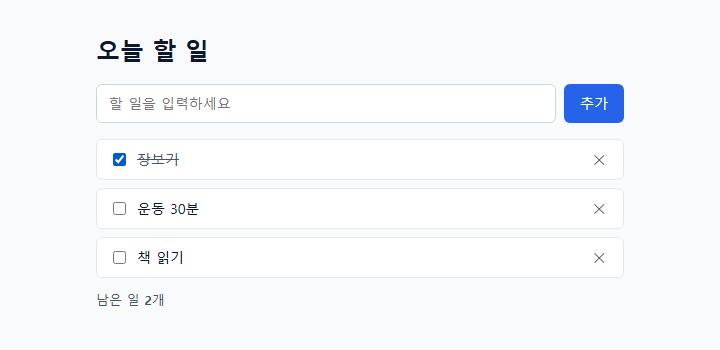
항목마다 체크박스와 삭제 버튼을 붙이고, 남은 일 개수를 보여 줍니다.
// 3단계: 완료 표시와 삭제. 목록의 버튼은 data-action으로 구분하고, 어느 항목인지는 data-id로 찾습니다.
let nextId = 1;

const row = (item) => vf.html`
  <li class="todo__item" data-id="${item.id}" data-state="${item.done ? 'done' : 'open'}">
    <input type="checkbox" id="done-${item.id}" data-action="toggle" ${item.done ? 'checked' : ''}>
    <label class="todo__text" for="done-${item.id}">${item.text}</label>
    <button class="todo__remove" type="button" data-action="remove" aria-label="삭제">✕</button>
  </li>`;

// 이벤트가 일어난 줄의 data-id를 숫자로 돌려줍니다.
const idOf = (e) => Number(e.target.closest('[data-id]').getAttribute('data-id'));

const todo = vf.vfunc({
  state: { items: [] },
  render: (s) => {
    const left = s.items.filter((item) => !item.done).length;
    return vf.html`
      <form class="todo__form" data-action="add">
        <input class="todo__input" name="text" data-ref="input" aria-label="할 일"
               placeholder="할 일을 입력하세요" autocomplete="off" required>
        <button class="todo__button" type="submit">추가</button>
      </form>
      <ul class="todo__list">${s.items.map(row)}</ul>
      <p class="todo__footer">남은 일 <strong data-ref="left">${left}</strong>개</p>`;
  },
  methods: {
    add(text) {
      this.items = this.items.concat({ id: nextId++, text: text, done: false });
    },
    toggle(id) {
      this.items = this.items.map((item) => (item.id === id ? { id: item.id, text: item.text, done: !item.done } : item));
    },
    remove(id) {
      this.items = this.items.filter((item) => item.id !== id);
    }
  },
  delegates: [
    {
      selector: '[data-action="add"]',
      eventType: 'submit',
      onEvent: (e) => {
        e.event.preventDefault();
        const text = e.sender.refs.input.value.trim();
        if (text) e.sender.add(text);
      }
    },
    { selector: '[data-action="toggle"]', eventType: 'change', onEvent: (e) => e.sender.toggle(idOf(e)) },
    { selector: '[data-action="remove"]', eventType: 'click', onEvent: (e) => e.sender.remove(idOf(e)) }
  ]
});

todo.mount('#app');
row는 항목 하나를 그리는 함수입니다. 줄마다data-id를 붙여 어느 항목인지 알 수 있게 합니다.- 버튼마다 이벤트를 걸지 않습니다. 컴포넌트에
data-action="toggle",data-action="remove"위임을 하나씩만 두고,idOf(e)로 줄의data-id를 읽습니다. 항목이 1000개여도 리스너는 세 개입니다. methods에 동작을 모았습니다. 안에서this는 컴포넌트이고this.items는state.items입니다.- 완료된 줄은
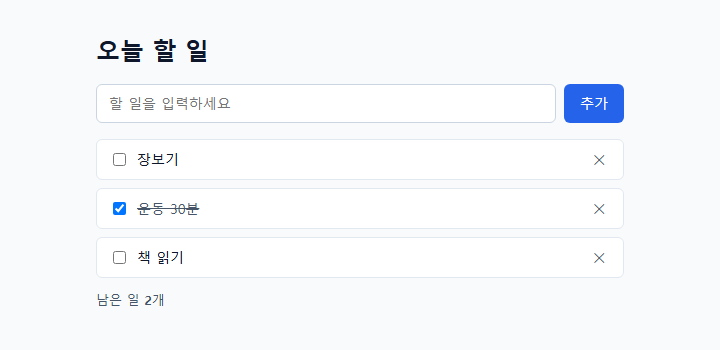
data-state="done"이고, 줄 긋기는 style.css의[data-state="done"]이 합니다. JS는 모양을 정하지 않습니다.
4단계: 저장하기
지금은 새로고침하면 목록이 사라집니다. 브라우저 저장소(localStorage)에 저장합니다.
// 4단계: 저장. 목록이 바뀔 때마다 브라우저(localStorage)에 저장하고, 페이지를 열 때 불러옵니다.
const KEY = 'vfunc-tutorial-todo';

// 저장된 값은 바깥 데이터이므로 필요한 필드만 골라 씁니다.
function load() {
  try {
    const saved = JSON.parse(localStorage.getItem(KEY)) || [];
    return saved.map((item) => ({ id: Number(item.id), text: String(item.text), done: item.done === true }));
  } catch (err) {
    return [];
  }
}

const saved = load();
let nextId = saved.reduce((max, item) => Math.max(max, item.id), 0) + 1;

const row = (item) => vf.html`
  <li class="todo__item" data-id="${item.id}" data-state="${item.done ? 'done' : 'open'}">
    <input type="checkbox" id="done-${item.id}" data-action="toggle" ${item.done ? 'checked' : ''}>
    <label class="todo__text" for="done-${item.id}">${item.text}</label>
    <button class="todo__remove" type="button" data-action="remove" aria-label="삭제">✕</button>
  </li>`;

const idOf = (e) => Number(e.target.closest('[data-id]').getAttribute('data-id'));

const todo = vf.vfunc({
  state: { items: saved },
  render: (s) => {
    const left = s.items.filter((item) => !item.done).length;
    return vf.html`
      <form class="todo__form" data-action="add">
        <input class="todo__input" name="text" data-ref="input" aria-label="할 일"
               placeholder="할 일을 입력하세요" autocomplete="off" required>
        <button class="todo__button" type="submit">추가</button>
      </form>
      <ul class="todo__list">${s.items.map(row)}</ul>
      <p class="todo__footer">남은 일 <strong data-ref="left">${left}</strong>개</p>`;
  },
  // 다시 그릴 때마다 호출됩니다. 여기서 저장합니다.
  onUpdate: (inst) => {
    localStorage.setItem(KEY, JSON.stringify(inst.items));
  },
  methods: {
    add(text) {
      this.items = this.items.concat({ id: nextId++, text: text, done: false });
    },
    toggle(id) {
      this.items = this.items.map((item) => (item.id === id ? { id: item.id, text: item.text, done: !item.done } : item));
    },
    remove(id) {
      this.items = this.items.filter((item) => item.id !== id);
    }
  },
  delegates: [
    {
      selector: '[data-action="add"]',
      eventType: 'submit',
      onEvent: (e) => {
        e.event.preventDefault();
        const text = e.sender.refs.input.value.trim();
        if (text) e.sender.add(text);
      }
    },
    { selector: '[data-action="toggle"]', eventType: 'change', onEvent: (e) => e.sender.toggle(idOf(e)) },
    { selector: '[data-action="remove"]', eventType: 'click', onEvent: (e) => e.sender.remove(idOf(e)) }
  ]
});

todo.mount('#app');
onUpdate는 다시 그릴 때마다 불립니다. 목록이 바뀌면 다시 그려지므로 여기서 저장하면 됩니다.load()는 저장된 글을 읽어 목록으로 되돌립니다. 저장소 값은 바깥에서 바뀔 수 있으므로 필요한 필드(id,text,done)만 골라 씁니다.- 새 항목 번호(
nextId)는 저장된 번호 다음부터 매깁니다. - 저장소는 이 브라우저, 이 주소에만 있습니다. 다른 컴퓨터나 시크릿 창에서는 보이지 않습니다.
5단계: 컴포넌트 쓰기
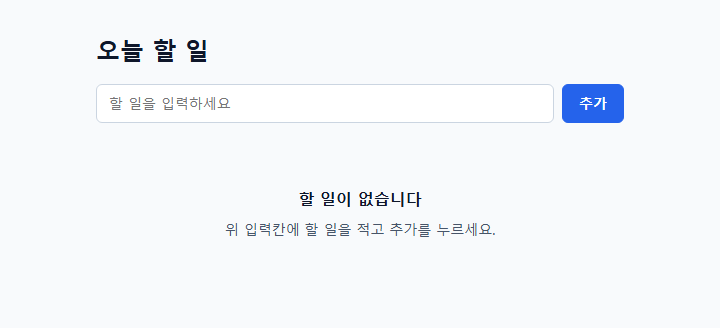
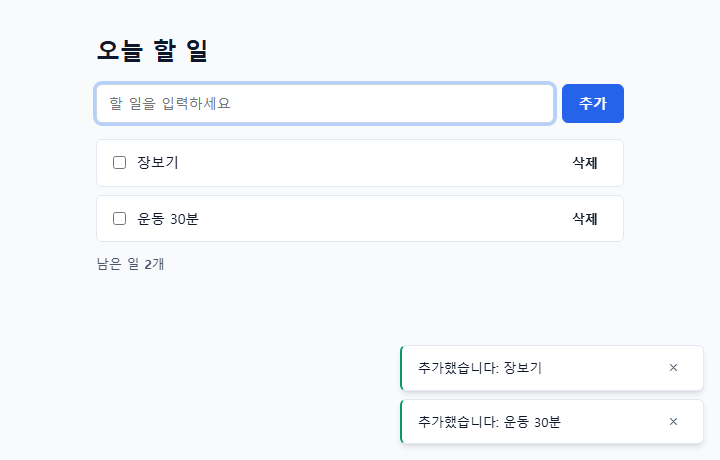
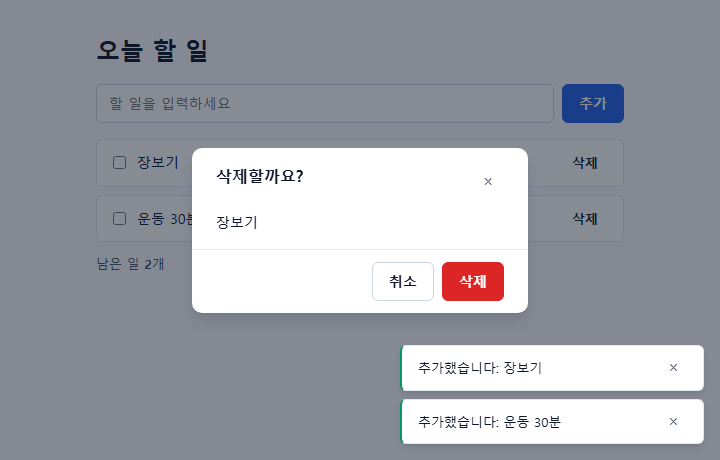
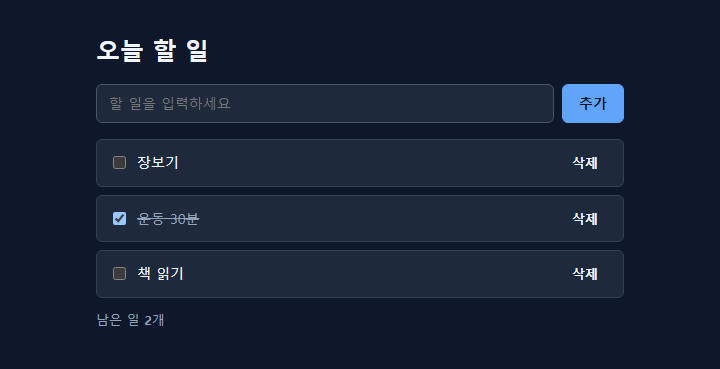
vfunc에는 버튼, 빈 화면, 알림, 확인 창 같은 컴포넌트(vfunc-ui)가 있습니다. 필요한 곳에만 골라 씁니다. index.html에 파일 세 줄을 더합니다(vfunc-ui.css, vfunc-ui.js, 한국어 문구 vfunc-ui.locale.ko.js).
<!DOCTYPE html>
<html lang="ko">
<head>
  <meta charset="utf-8">
  <meta name="viewport" content="width=device-width, initial-scale=1">
  <meta http-equiv="Content-Security-Policy"
        content="default-src 'self'; script-src 'self' https://cdn.jsdelivr.net; style-src 'self' https://cdn.jsdelivr.net; img-src 'self' data:; object-src 'none'; base-uri 'none'">
  <title>할 일 — 5단계</title>
  <link rel="stylesheet" href="https://cdn.jsdelivr.net/npm/vfunc@1.2.0/css/vfunc.tokens.css"
        integrity="sha384-QwsFKKFVXW8Lo7pML80GpQro2b0FlTfTrSjGN+YMCyx868Oa2bXlbYRGuUUbgiVw" crossorigin="anonymous">
  <link rel="stylesheet" href="https://cdn.jsdelivr.net/npm/vfunc@1.2.0/css/vfunc-ui.css"
        integrity="sha384-lb4q+RHHylsEIsyBQuDJbSZAAocK3fj1H4bBQFf5S7UoMLfN2j3L/G9L5AYE6uIA" crossorigin="anonymous">
  <link rel="stylesheet" href="./style.css">
</head>
<body>
  <main class="todo">
    <h1 class="todo__title">오늘 할 일</h1>
    <div id="app"></div>
  </main>
  <script src="https://cdn.jsdelivr.net/npm/vfunc@1.2.0/dist/vfunc.js"
        integrity="sha384-HOwph430qtUZpsvBjI0IzL1lkEipwi7yZYM7X7z21/bLJsChFHRF9E5OvWde7RjH" crossorigin="anonymous"></script>
  <script src="https://cdn.jsdelivr.net/npm/vfunc@1.2.0/dist/vfunc-ui.js"
        integrity="sha384-I+GaVCl8OOTjHk4zMfuH/l8vwopR07O0vlZUgVvqmwSJwKjtG6+u8Yc3KkZBUm3G" crossorigin="anonymous"></script>
  <script src="https://cdn.jsdelivr.net/npm/vfunc@1.2.0/dist/vfunc-ui.locale.ko.js"
        integrity="sha384-mFqQlhYgsg+ftO7b2N4njBVTehRpPziqz+7qYTVLypq9bmsar1dnoYPVro/wSl4Z" crossorigin="anonymous"></script>
  <script src="./app.js"></script>
</body>
</html>
app.js:
// 5단계: 컴포넌트 쓰기(vfunc-ui). 버튼·빈 화면은 vs*(마크업), 알림·확인 창은 vf*(인스턴스)입니다.
const KEY = 'vfunc-tutorial-todo';

function load() {
  try {
    const saved = JSON.parse(localStorage.getItem(KEY)) || [];
    return saved.map((item) => ({ id: Number(item.id), text: String(item.text), done: item.done === true }));
  } catch (err) {
    return [];
  }
}

const saved = load();
let nextId = saved.reduce((max, item) => Math.max(max, item.id), 0) + 1;
let toast;   // 알림 영역. 페이지에 하나만 만듭니다(아래 맨 끝).

const row = (item) => vf.html`
  <li class="todo__item" data-id="${item.id}" data-state="${item.done ? 'done' : 'open'}">
    <input type="checkbox" id="done-${item.id}" data-action="toggle" ${item.done ? 'checked' : ''}>
    <label class="todo__text" for="done-${item.id}">${item.text}</label>
    ${vf.vsButton({ label: '삭제', variant: 'ghost', size: 'sm', action: 'remove' })}
  </li>`;

const idOf = (e) => Number(e.target.closest('[data-id]').getAttribute('data-id'));

const todo = vf.vfunc({
  state: { items: saved },
  render: (s) => {
    const left = s.items.filter((item) => !item.done).length;
    return vf.html`
      <form class="todo__form" data-action="add">
        <input class="todo__input" name="text" data-ref="input" aria-label="할 일"
               placeholder="할 일을 입력하세요" autocomplete="off" required>
        ${vf.vsButton({ label: '추가', type: 'submit', variant: 'primary' })}
      </form>
      ${s.items.length
        ? vf.html`<ul class="todo__list">${s.items.map(row)}</ul>
                  <p class="todo__footer">남은 일 <strong data-ref="left">${left}</strong>개</p>`
        : vf.vsEmptyState({ title: '할 일이 없습니다', description: '위 입력칸에 할 일을 적고 추가를 누르세요.' })}`;
  },
  onUpdate: (inst) => {
    localStorage.setItem(KEY, JSON.stringify(inst.items));
  },
  methods: {
    add(text) {
      this.items = this.items.concat({ id: nextId++, text: text, done: false });
      toast.show({ message: '추가했습니다: ' + text, variant: 'success' });
    },
    toggle(id) {
      this.items = this.items.map((item) => (item.id === id ? { id: item.id, text: item.text, done: !item.done } : item));
    },
    // 지우기 전에 한 번 묻습니다. open()은 사용자의 답(true/false)을 기다립니다.
    async remove(id) {
      const item = this.items.find((x) => x.id === id);
      const dialog = vf.vfConfirm({ title: '삭제할까요?', message: item.text, variant: 'danger', confirmLabel: '삭제' });
      const ok = await dialog.open();
      dialog.destroy();
      if (!ok) return;
      this.items = this.items.filter((x) => x.id !== id);
      toast.show({ message: '삭제했습니다' });
    }
  },
  delegates: [
    {
      selector: '[data-action="add"]',
      eventType: 'submit',
      onEvent: (e) => {
        e.event.preventDefault();
        const text = e.sender.refs.input.value.trim();
        if (text) e.sender.add(text);
      }
    },
    { selector: '[data-action="toggle"]', eventType: 'change', onEvent: (e) => e.sender.toggle(idOf(e)) },
    { selector: '[data-action="remove"]', eventType: 'click', onEvent: (e) => e.sender.remove(idOf(e)) }
  ]
});

// 컴포넌트의 기본 문구(취소, 닫기 등)를 한국어로 바꾼 뒤 시작합니다.
vf.i18n.set('ko').then(() => {
  toast = vf.vfToast();
  todo.mount('#app');
});
vf.vs…는 HTML 조각을 돌려줍니다.render안에${vf.vsButton({ … })}처럼 그대로 넣습니다.action: 'remove'는data-action="remove"가 되어 3단계의 위임이 그대로 동작합니다.vf.vf…는 살아 있는 컴포넌트를 돌려줍니다. 알림 영역vf.vfToast()는 페이지에 하나만 만들고toast.show({ … })로 씁니다.vf.vfConfirm의open()은 사용자가 고를 때까지 기다립니다. 그래서remove에async를 붙이고await로 답을 받습니다. 답을 받으면destroy()로 정리합니다.vf.i18n.set('ko')는 컴포넌트의 기본 문구(취소, 닫기)를 한국어로 바꿉니다. 문구를 불러온 뒤 알림 영역을 만들고 앱을 붙입니다.
6단계: 인터넷에 올리기
운영용 파일로 바꿉니다. 개발용 vfunc.js는 경고 문구가 들어 있어 큽니다. 올리기 전에 index.html의 스크립트를 min 파일로 바꿉니다. 아래는 5단계 index.html의 운영용입니다(integrity도 파일에 맞게 바뀌었습니다).
<!DOCTYPE html>
<html lang="ko">
<head>
  <meta charset="utf-8">
  <meta name="viewport" content="width=device-width, initial-scale=1">
  <meta http-equiv="Content-Security-Policy"
        content="default-src 'self'; script-src 'self' https://cdn.jsdelivr.net; style-src 'self' https://cdn.jsdelivr.net; img-src 'self' data:; object-src 'none'; base-uri 'none'">
  <title>할 일 — 5단계</title>
  <link rel="stylesheet" href="https://cdn.jsdelivr.net/npm/vfunc@1.2.0/css/vfunc.tokens.css"
        integrity="sha384-QwsFKKFVXW8Lo7pML80GpQro2b0FlTfTrSjGN+YMCyx868Oa2bXlbYRGuUUbgiVw" crossorigin="anonymous">
  <link rel="stylesheet" href="https://cdn.jsdelivr.net/npm/vfunc@1.2.0/css/vfunc-ui.css"
        integrity="sha384-lb4q+RHHylsEIsyBQuDJbSZAAocK3fj1H4bBQFf5S7UoMLfN2j3L/G9L5AYE6uIA" crossorigin="anonymous">
  <link rel="stylesheet" href="./style.css">
</head>
<body>
  <main class="todo">
    <h1 class="todo__title">오늘 할 일</h1>
    <div id="app"></div>
  </main>
  <script src="https://cdn.jsdelivr.net/npm/vfunc@1.2.0/dist/vfunc.min.js"
        integrity="sha384-yTR0o8US3nk+D1XIBAsv1O/lMFA5tV3V021xPo8yxyqnBNSxi1rqINVvBOykAEkK" crossorigin="anonymous"></script>
  <script src="https://cdn.jsdelivr.net/npm/vfunc@1.2.0/dist/vfunc-ui.min.js"
        integrity="sha384-bjDcJm9zuGIIvCwh/qrHrukBRpbwhH5dnnDDM7Z0vByWS9N8bQWs3RfqseMNajiy" crossorigin="anonymous"></script>
  <script src="https://cdn.jsdelivr.net/npm/vfunc@1.2.0/dist/vfunc-ui.locale.ko.js"
        integrity="sha384-mFqQlhYgsg+ftO7b2N4njBVTehRpPziqz+7qYTVLypq9bmsar1dnoYPVro/wSl4Z" crossorigin="anonymous"></script>
  <script src="./app.js"></script>
</body>
</html>
GitHub Pages로 올리기 (무료, 계정만 있으면 됩니다):
- github.com에 가입하고 오른쪽 위 + → New repository를 누릅니다. 이름(예:
todo)을 적고 Public으로 만듭니다. - 저장소 화면에서 Add file → Upload files를 누르고
index.html,style.css,app.js를 끌어다 놓은 뒤 Commit changes를 누릅니다. - Settings → Pages에서 Source를 Deploy from a branch, Branch를 main과 / (root)로 고르고 Save를 누릅니다.
- 1~2분 뒤 같은 화면 위쪽에 주소(
https://<아이디>.github.io/todo/)가 나타납니다. 그 주소를 다른 사람에게 보내면 됩니다.
- 계정 없이 해 보려면 Netlify Drop에
todo폴더를 끌어다 놓아도 됩니다. - 파일을 고쳐 다시 올렸는데 예전 화면이 보이면 새로고침(Ctrl+F5)합니다. 서버의 캐시 설정은 배포에 있습니다.
막힐 때
| 증상 | 확인할 것 |
|---|---|
| 화면이 비어 있음 | F12 → Console의 빨간 글. vf is not defined면 index.html의 vfunc 주소나 <script> 순서(vfunc가 app.js보다 먼저) |
주소가 file://로 시작함 | 파일을 더블클릭해서 열었습니다. 서버를 켜고 http://localhost:8080/으로 엽니다 |
Refused to load 또는 Content-Security-Policy 오류 | index.html의 보안 줄에 https://cdn.jsdelivr.net이 있는지, 파일 주소가 맞는지 |
integrity 오류 | 버전과 integrity 값이 짝이 맞지 않습니다. 이 페이지의 코드를 다시 복사합니다 |
| 추가를 누르면 페이지가 새로 고쳐짐 | e.event.preventDefault()가 빠졌습니다 |
onclick="…"이 동작하지 않음 | 보안 설정이 막습니다. data-action과 delegates를 씁니다 |
| 새로고침하면 목록이 사라짐 | 시크릿 창이거나 브라우저가 저장소를 막고 있습니다. 4단계 코드의 onUpdate도 확인합니다 |
그래도 안 되면 FAQ를 보거나 GitHub Discussions에 질문을 남겨 주세요. 콘솔 오류 문구를 함께 적으면 빨리 답할 수 있습니다.
다음으로
- 스타터와 AI로 앱 만들기: 여러 화면, 한국어/영어, 테마를 갖춘 앱 골격을 받아 AI에게 기능을 시켜 봅니다. 연습 과제 10개가 있습니다.
- 핵심 개념: 컴포넌트, 상태, 이벤트, 기존 HTML 제어를 자세히 봅니다.
- 컴포넌트: 5단계에서 쓴 것 말고도 60여 개가 있습니다.
- 예제: 21개 예제의 소스와 실행 화면.